
Thank you for coming to my Featherweight Skill Series! There are thousands of us who love our little 221s but need or want a little more "know-how" on using them to their fullest potential. I hope my posts and videos will help you get more know-how and confidence in using your beautiful Featherweight. Enjoy the classes!
Class #7 - Adjustable Hemmer

Class supply list:
Your fully threaded sewing machine, the Adjustable Hemmer, two or three practice strips of fabric cut on the grain line: 5" X WOF (width of fabric)
Let's get sewing!
The first thing to say about this accessory is it is to be used for straight seams. Hemming around curves will not produce good results. If you're hemming curtains or items that require a long, straight hem, this is your go-to tool.
Not every project calls for narrow hems! With this attachment, you can sew hems from 3/16" to whatever depth you need.
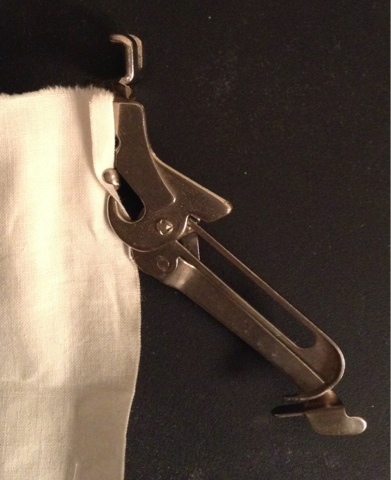
The unit looks complex but the mystery is over when you understand what it does. The part of the unit on the upper edge turns your fabric edge under and the part on the lower edge with the numbers on it measures the amount of fabric that is folded over for the hem depth.
Let's look at the back.

You can easily find the needle hole at the top. Under it are two hooks that turn the fabric edge under to form the roll for stitching. The lower left curved edge is the measuring gauge.
Here it is with fabric in loaded it.
From the back: you can see how the fabric needs to be caught in the hooks to form the curl.

And how it will look from the top: your fabric goes off to the left and the hem is being formed with the attachment. You are stitching on the back of your project.

I think it's easiest to load the fabric into the hemmer before you attach it to the sewing machine. That way, you know the curl is forming. Bring the needle all the way up. Hold the fabric and hemmer in your right hand and screw it in place.
The hem is being stitched on the back of the project. Your tension should be neat and even!
The numbers on the gauge indicate 1/8" increments. My setting has the pointer at 4/8", which is 1/2". The guide will allow up to a scant 1" hem. Change the width by unscrewing the knob and sliding the gauge to the number width you want. Tighten the knob enough to hold it in place.
The video shows my procedure for using it as a measured hemmer.
The video shows my procedure for using it as a measured hemmer.
What if you want a larger hem? Maybe one that's 2"...
Notice the notch at the end of the gauge

Don't force it. Carefully ease it around into this position.

When you insert the fabric into the hooks, it will look like this underneath the unit-
And from the top-
the edge of the fabric is turned under while the unit sits on top of the hem. Nothing is going through the measurement guide. All you are using in this position are the hooks to form the curl.

Mount the foot onto the machine first and ease the rolled edge into the hooks. With wide hemming, you would want to turn the width over and finger-press or pin it to help keep it in place while you stitch. This is not required, of course, but do whatever will help you get the best result! Practicing a lot helps too!
This video demonstrates using the hemmer on wide hems.
Here's another hem I made with the adjustable hemmer.
The back-

Notice how it stitches right along the edge? You have to watch and sew slowly to stay on the rolled edge!

Homework: Take your fabric strips and hem a 5/8" hem and a 2" hem.
Remember 1) this foot is used for straight, on-grain hems 2) load the fabric in the unit and then attach to machine 3) you are stitching on the inside, or on the back, of your project, and 4) sew slowly and watch that the stitches are catching the roll of the fabric.
I hope you have been encouraged to use your Adjustable Hemmer. If you need one, let me know. I have some extras that I can sell. Please share your pics on our Facebook group page, Featherweight Skill Series, so we can see your creations!
If you like the series, please share the link with your friends, pin it to Pinterest, join my Facebook group... Most importantly, "Let's get sewing!"
4 comments:
I'm so glad I found your blog! This is the best explanation on this attachment! Thank you for sharing!
اشتري ميني ن
Огромное сердечное спасибо. От бабушки досталась машинка 1915г и набор лапок без инструкций. Ваше видео мне очень помогло.
1st time seeing your blog. Thoroughly enjoyed seeing the work with the FW hammer. Thanks.
Post a Comment