
Ah, the beautiful, intimidating Y-seam. It makes a lovey, mitred picture frame effect in a quilt block.

We love to see it in completed projects but shy away from sewing seams that are disjointed in construction. If you've sewn for any length of time, this is a desired skill! Let's practice up. Here are my tips to help you dive into the Y-seam world of sewing!
Things to get together to make this go well:
Threaded sewing machine, normal tension and pressure, medium stitch length, #12 needle
Edge guide for an accurate seam allowance
Fabric marking tool
Pins, thin ones to minimize distortion of the fabric
Cutting mat with measuring lines
Scissors
Steam iron and firm ironing surface
The first thing to make this a good experience is to cut your pieces out accurately.
We have the left edge, the top edge, and the center triangle.

Take a left edge and a center triangle, place the center triangle on top of the left edge, right sides together.

Pin it. Measure in 1/4" from the top and side edges, draw in the lines to make a cross mark.

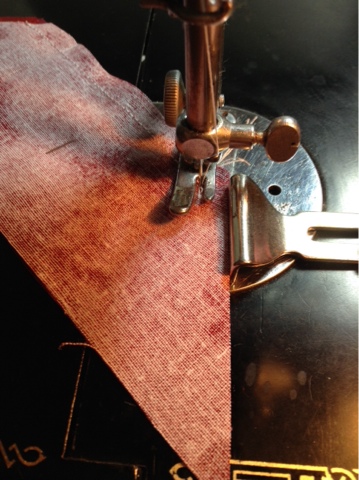
Set that cross mark under the foot and put the needle into its center point. You should be up against your edge guide, which is set at 1/4" from the needle.

When you get to the pointed end of the center triangle, raise the foot and needle, pull the fabric back a little to make room for the next set of fabric. Set the needle down into the cross point, repeat the seam procedure.

You can chain stitch these all day long!

When you're done, you'll have a stack of fabric sets that look like this. Almost birdlike!

Fold the center triangles so they are laying out the way that they would when finished.
Get the top edge pieces and lay them in the area where they need to be sewn on to the set.

Take one left edge with the attached center triangle and fold the center triangle back over the left edge.
Fold down the small section of the center triangle from the cross point and pin it. This keeps it out of the way while you sew the mitre seam.

Place the top edge over the side edge, right sides together. Pin in place.

Turn the fabric over so you see the prior sewing line. Set your needle at the edge of the line and sew to the point.
Like before, at the end of the seam, raise the needle and foot, move the set back a little so it's out of the way, and start to sew the next set.
You can chain sew these all day long!

When you're done, you'll have a pile that looks like this. They look like little origami boats!

Unfold the pieces and admire your beautiful mitred corner!

Ooh, aah! <3
Turn the pieces over so you see the back of the center triangle. Line up the unsewn edges more accurately, from the triangle's square corner first, then down to the point. Put a pin there to hold it all together.

This next step is important.
Take the center of the folded edge of the dog ear that's pointing to the right and pull it up so it is folding outward, with it's right sides together. Pin it so it stays out of the way while you sew up the last seam.

Place the set, center triangle point going in first, butting along the edge guide and sew from the point towards the center where the other seam is.

Stop when you reach the other seam!
Back stitch a couple stitches to lock the thread in place.

Raise your pressure foot, pull the fabric back a little to make room for your next set.

You can chain sew these all day!

Now you have a finished pile that looks like this!

Unfold the sets.
Start out with some finger pressing to get the fabric laying down where you want it.

The edges are pretty close to being a triangle along the mat's ruler lines.
Pressing will get it into its shape.
Use your hot, steamy iron to set the seams open.
See how your right angle and mitre seams are lining up nicely on the cutting mat lines!

And the back looks nice and neat too! It will be easier to quilt with the seams open.

Even when you're careful, things can still go wrong in the stitching.
This one has a little bump at the mitre point and the outer edges don't line up.

The back shows the seams never joined at the point of the Y.

Pressing it does not help. To make it flat and to line up the outer edges, this seam would need to come out and be resewn.

I hope my tips have given you some gumption to sew up some Y-seams! I'd love to see your pictures and hear from you in any of my Facebook pages! Let's get sewing!
No comments:
Post a Comment