Thank you for coming to my Featherweight Quilting Skill Series! There are thousands of us who love our little 221s but need or want a little more "know-how" on using them to their fullest potential. I hope my posts and videos will help you get more know-how and confidence in using your beautiful Featherweight for quilting. Enjoy the classes!
Class #4 - Trapunto with the Quilter Foot
Class supply list:
Your fully threaded sewing machine with the Quilter foot, stitch length around 12 and a light foot pressure setting, several practice sandwiches up to 12" across, hand needle with a large eye, yarn, scrap pieces of batting, a stiletto or toothpick, and a big imagination!
Let's get sewing!
Trapunto is achieved by a thicker layer of filling material placed behind your top fabric to produce a puffy result. There are several ways to get this result and I'll show you three.
The most subtle and softest trapunto effect would be to stitch a shape with the Quilter foot and leave it unstuffed.
The stitching causes the fabric to puff up in the center of the stitched area as the layer of batting fluffs up. Technically, this is not a true trapunto since it only has one layer of fill but it gives a nice result and keeps the fabric from becoming stiff.
The more common trapunto technique is to thread yarn onto a needle and use that as a filler in a stitched channel or shape on the fabric sewn with the Quilter foot.
Go to the back of the design and insert the needle into the end of the stem. Push it along as far as it will go along the stem's curve.
To continue around the curve, reinsert the needle in the same hole where it came out.
Snip the ends and it looks like this.
Under the flower, I used two strands of yarn in each pass. I entered on one side and went straight through to the other side. I put in. Three passes of yarn and then trimmed them off.
A little red french knot looked pretty in the center!
See how the raised stem and flower are puffed and pop up compared to the one next to it? This is a nice way to accent something special on a project.
The last technique I'll share will involve cutting the back of the sandwich where there's a larger shape to fill.
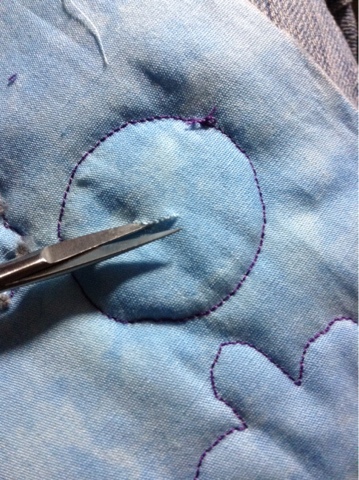
Sew your shape with the Quilter foot. Cut a small slit in the backing fabric with pointy scissors.
Take a stiletto or toothpick or whatever you have that's thin and pointy and insert pieces of batting into the shape.
Keep adding batting until you like the result on the front.
I decided to add more stitching around petals with my Quilting foot for a subtle trapunto effect. If left unstitched, you'd want to sew the slit closed with a hand needle.
Now step back and admire your skillful trapunto handiwork! Which method do you prefer? What are you sewing that could become more interesting with some trapunto?
Remember this sample from last week in class #3? This would be a great candidate for trapunto!
Homework: Take your fabric sandwich and practice curvy lines that touch to become enclosed or rounded shapes. Fill the shapes with yarn or batting to achieve the trapunto effect.
I hope you have been encouraged to use your amazing sewing machine accessories. Please share your pics on our Facebook group page, Featherweight Skill Series, so we can see your creations!
If you like the series, share the link with your friends, pin it to Pinterest, join my Facebook group... Most importantly, "Let's get sewing!"
See you next time!
By Pamelyn Baim. 2016


1 comment:
I love your instructions! Thank you for sharing!
Post a Comment