This is it! The last clue of the Ringing In The New Year mystery! It's all about the 3 B's!
We will be working on batting, backing, and what I like to call “mock binding” to complete our project. There's no time limit but stay determined to finish it so this doesn't wind up being an unfinished project!
Sparkie says to work all the way through this clue - you're almost done!
Since this is meant to be a smaller sized project, I did not add border rows to the top. The dimensions of my top came out to approximately 42” by 54” this is a great size as a throw, a stroller or crib blanket, a comfort blanket for a small child, or one to grab and use on the go. Or whatever ideas you have for it!
Let’s start! Get out your batting. Find a place where you can lay the pieces of your project out, all nice and flat. I have an open spot on the floor that I use, but with this size top, you could spread it all out on something else like a mattress or a large tabletop. Unroll and place the batting down first, then cover it with the top. You will want to trim the batting with approximately 1-2” beyond the all of edges of the top. (If you plan to quilt it with a longarm machine, then give it at least 5” so it will wind securely.)
With this overage, your chance of maintaining batting under the edges is better since it will probably shift as you quilt it. Now fold these up a little bit and set them aside.
If your backing fabric is too small, add borders on the edges to bring the size up to what you need it to be. The borders do not have to be fancy but the color on the outer edges need to match the colors on the top.
Your gorgeous piece of dark colored, ironed fabric will
be your backing piece. Place this fabric pretty side DOWN on your
table/bed/floor. Take your batting and top and unfold it on top of the backing.
The backing should also extend 1”-2” beyond the edges of the top. So my top is
42” by 54”, my batting and backing should be at least 44" by 56”, all
centered on top of each other. If you are uncertain of your outcome with this
part, having too much overage will be better than too little so make your overages
on each side bigger than 1" and you can trim them back later.
Longarm quilters should keep their edge overage at least
5 or 6" on all edges. Load your sandwich on your machine and quilt away!
Join back up with the mock binding part of the instructions.
Now you have all the pieces of your quilt sandwich! It's
time to get the layers to stay together.
There are several methods of basting. You can use safety
pins, bent safety pins, straight pins with end pieces (like Pinmoors), or
basting spray. I have used spray, which works great, and bent safety pins,
which also works great, and a combo of the two. I find myself grabbing for the
safety pins more often than the spray. I think it is because it doesn't seem as
permanent as the adhesive spray and I can adjust the layers if needed. Keep the
layers really flat and try to keep the overages in place so they can be used
later.
It's time to quilt! This is not as scary as it sounds. If
you want to do straight or slightly curved lines for your quilting, I highly recommend
using a walking foot for this. If you do not have one, take care to keep the
layers from shifting by having more basting pins or spray baste the layers
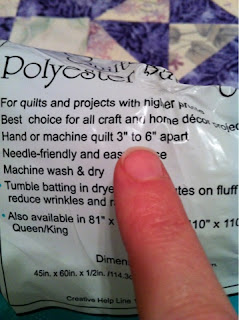
together. The batting will have a description of how close the quilting
stitches need to be to minimize shifting over time. If your batting calls for a
6" maximum stitching clearance, then your lines need to be within 6"
of each other. You can use your sewing machine throat as a guide. Measure
6" over from the needle and see what is on your machine at that point. If
your reverse button on your machine is right above that point, you can use it
as your guide. Is nothing there? Use a piece of masking tape and put a pen mark
on it as your guide. This doesn't have to be an exact science; I'm sure you can
get the idea! Now, start your first seam right down the middle and work
your way outwards. You can do lines going from top to bottom or side to side or
both ways! Decide what you want and get your entire top stitched together.
Here is an example on a different quilt where I did wavy lines on my sewing machine with a walking foot to keep the layers moving together.
Another way you can secure the layers is to tie them together. Get a long needle (curved ones are great for this method) and insert a very heavy quilting thread or 1 strand of embroidery thread in it. Start in the center of the quilt. Place a stitch through to the back, move the needle over 1/8", and come back up through to the top of the quilt. Then tie the thread into a tight knot and trim the thread ends to about 1" long. Continue to place the ties all over the entire quilt, keeping within the needs of the batting's requirements. If your clearance is 4" (as above) then a 12" square would need 16 ties in it.
If you have done free motion quilting (FMQ) then you have many more options for designs. Decide what you want to put on your top, start in the middle and work your way outward. Do all one design or mix them up. I enjoy doing swirly line patterns when I do FMQ. I have no qualms about stitching over stitches. Some say you need to keep stitches off of each other. I figure if it's my project, I can do what I like with it!
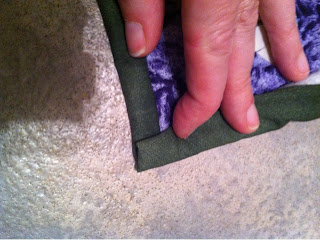
...and then fold it again so it covers the edge of the top by 1/4". You know where that is by the outer points of the Broken Dishes squares. Pin the rolled, mock binding in place as you go. The batting makes that rolled edge a little puffy, which looks nice.
At the corners, choose between a mitered corner or a squared corner. Here's instructions for each.
Mitered edges: you will fold the backing fabric on the 90-degree angle under the top corner pretty close to the corner's tip.
When you do the double fold up to that corner, you will see one side of a miter happen automatically. Pin that down. Double fold the next edge and match up the other half of the miter and pin that side down. Sew down by hand or machine. Make sure you sew together the seam in the miter.
Squared edges: you will double fold the edge all the way across, including over the corners, pinning as you go. Trim out some of the inner material in the corners to reduce bulk. Repeat on all sides. You can do the sides first and then the top and bottom, or do one side after another. Sew down by hand or machine.
There it is! All quilted and ready for whatever you want to do with it! I hope you enjoyed making this mystery as much as I did creating it! Please share your comments here, and your photos at my Facebook page!


No comments:
Post a Comment