 Here we go! For this step, I wanted to keep it simple and warm us up with our tools. You're welcome! :-D
We will be making squares! Yes, that's right, a whole bunch of 2-1/2" squares!
I'm starting with the medium shade of my cold color.

First things first! The edges need to be evened up.

I folded my fabric so the long folded edge was aligned and placed along a line on the mat.

You can see it's over 1" off on one end! Trim off that uneven edge.
Now there is a straight edge and I can get strips cut. I'll show you two ways to do this!
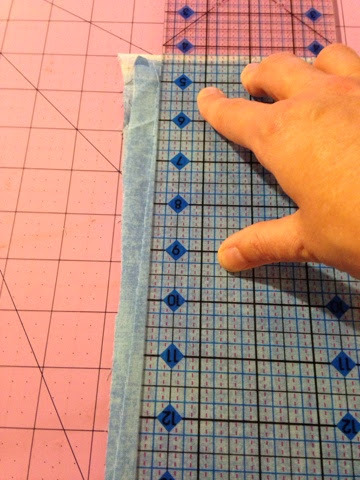
I lined up the top ruler over the fabric on the 2-1/2" line. See the narrow black line along the blue edge? The cutting edge is 2-1/2" into the fabric.

I cut four width-of-fabric strips for starters. How many? 168 total! I will need more than four strips to get 168 squares! But I can see how many each strip makes and then I'll figure out how many I need to cut.
Don't forget to cut off the selvage edges! The ends with the white part on them gotta go!
The strips are now ready to be cut again to make squares.
Don't forget to cut off the selvage edges! The ends with the white part on them gotta go!
The strips are now ready to be cut again to make squares.

Here's the way to cut with a regular straight edge cutting ruler.
I keep the strips folded in half and place four strips on the mat. I set the top ruler along that trimmed edge on the 2-1/2" line on the top ruler ...

and make the cut! Gently pull away the squares and move the ruler to the new edge and make the next cut! Keep going down the strips until you can't get any more 2-1/2" squares.

You'll have a small piece on the folded end of the strip when you're done.
My four strips produced 7 cuts, making 32 squares but because they were all folded in half, I wound up with 64 squares!

Since I'm using width of fabric strips, I need a total of 11 strips to get all of the 168 squares that I need for this clue. If you are using different sized strips, you will need to keep cutting and counting until you have enough squares.
Set the 2-1/2" strips down and place the Shape Cut guide on top of the strips.

Make sure the left side edges of the strips are lined up along the 0 cutting channel. If they aren't lined up with the channel, you can insert the rotary cutter into the channel and trim them so they are lined up evenly.

Find the 2-1/2" channel.
Set the rotary cutter into the lower end of the channel and slice! Find the next number that is 2-1/2" over from that line (5") and slice, etc. you can get 4 slices done without having to move the tool!

All of the completed 2-1/2" squares are stacked in piles of 10 while I was cutting them so I knew how many I had, and one was piled with 8.
Here's all of my 168 squares ready to go when the project needs them!

Clue 1 is done! Not so bad, right? Pat yourself on the back and look for Clue 2 on January 8th!
The video for this clue is in its own post. Check it out if you want a visual of what I showed here!
Share your comments here or at my Facebook page, Pamelyn's Postings where you can post pictures!
Share your comments here or at my Facebook page, Pamelyn's Postings where you can post pictures!
No comments:
Post a Comment